Most people’s first instinct is to buy a cat tree. A tall one, ideally in beige, from a big-box pet store. It arrives flat-packed, takes forty-five minutes to assemble, wobbles slightly at the top, and costs more than it should. Within a week, the cat has rejected it entirely in favor of a cardboard Amazon box that arrived the same day.
The pet store cat tree isn’t the problem. The problem is that it was designed for a generic cat, not yours. A DIY cat house gives you something a flat-pack tree never can: a structure built around your specific home, your specific cat, and your actual taste in furniture.
I built my first DIY cat shelf after watching my cat squeeze daily into a shoebox on top of the dryer and think deeply about her choices. The shelf took an hour and cost less than the shoebox situation was costing my sanity. She moved in immediately. I haven’t looked at a store-bought cat tree since.
These 8 indoor cat house plans range from a 20-minute drawer conversion to a weekend wall-perch build. None of them require professional woodworking skills, and several require no tools at all. Pick the one that matches your space, your cat’s personality, and how much Saturday you’re willing to spend.
At a Glance: All 8 Plans Compared
Use this table to find the right starting point before you read the full breakdown:
| Plan | Skill Level | Approx. Cost | Time to Build | Best For |
| Vertical Cat Tree House | Intermediate | $$–$$$ | Half day–weekend | Active climbers |
| Shelving Cat Condo | Beginner | $–$$ | 2–3 hours | Style-conscious homes |
| Hidden Bed Under Furniture | Beginner | $ | 20–30 minutes | Shy, hide-loving cats |
| Drawer Cat Hideaway | Beginner | Free–$ | 20 minutes | Small spaces, quick wins |
| Stacked Crates Cat House | Beginner | $–$$ | 2–4 hours | Multi-cat households |
| Wall-Mounted Cat Perch | Beginner/Intermediate | $–$$ | 1–2 hours | Cats who love height |
| Cat House in a Bookcase | Beginner | $ | 1 hour | Renters, no-drill options |
| Multi-Use Cat Furniture | Intermediate | $$–$$$ | Half day | Minimalist households |
Table of Contents
1. Vertical Cat Tree House
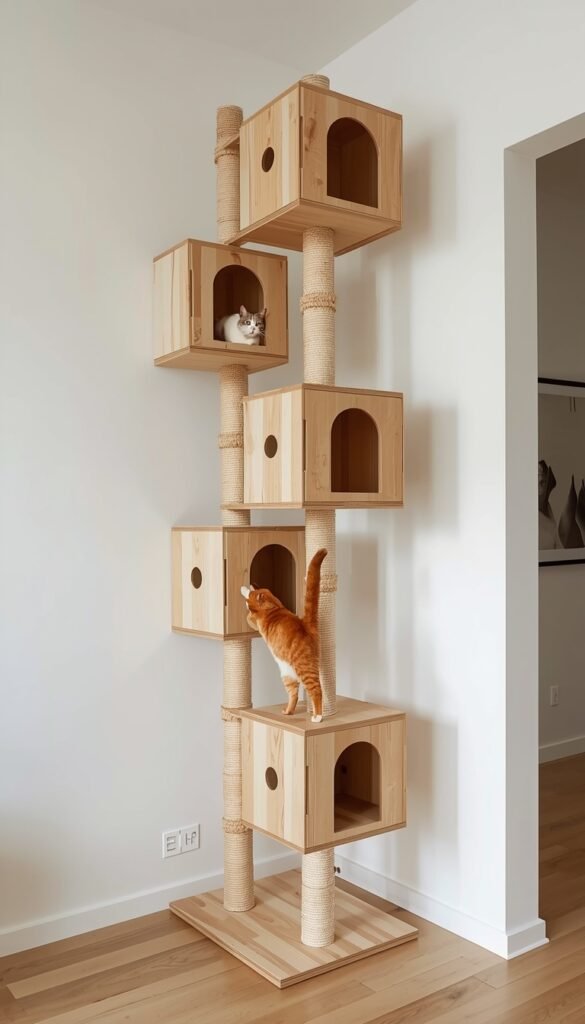
Why vertical space matters more than you think
Cats aren’t just recreational climbers. Vertical space is how they feel safe, establish territory, and decompress — and most indoor homes provide very little of it. A vertical cat tree house gives your cat what a blank floor never can: height, choice of level, and somewhere to survey the room without being at paw level with everything else.
Research from the Indoor Pet Initiative at Ohio State University highlights that cats in enriched vertical environments show significantly lower signs of stress and boredom compared to cats in flat, open spaces. In other words, height isn’t a luxury — it’s part of what makes an indoor cat genuinely content.
You don’t need to be a carpenter to build one. A few pieces of sturdy plywood, sisal rope for scratching posts, and a handful of raised platforms are the core of the build. Ramps between levels add comfort; small enclosed nooks at upper levels add security. Finish with non-toxic paint or stain, anchor the structure to wall studs if it’s taller than four feet, and you have something that looks like intentional furniture rather than a cat accessory.
- Materials needed: plywood, sisal rope, non-toxic paint or stain, L-brackets, screws, soft platform cushions
- Key safety rule: anchor tall structures to wall studs — cats launch off these at speed and an unstable tree is a real hazard
- Finish tip: staining rather than painting tends to look more integrated with existing wooden furniture
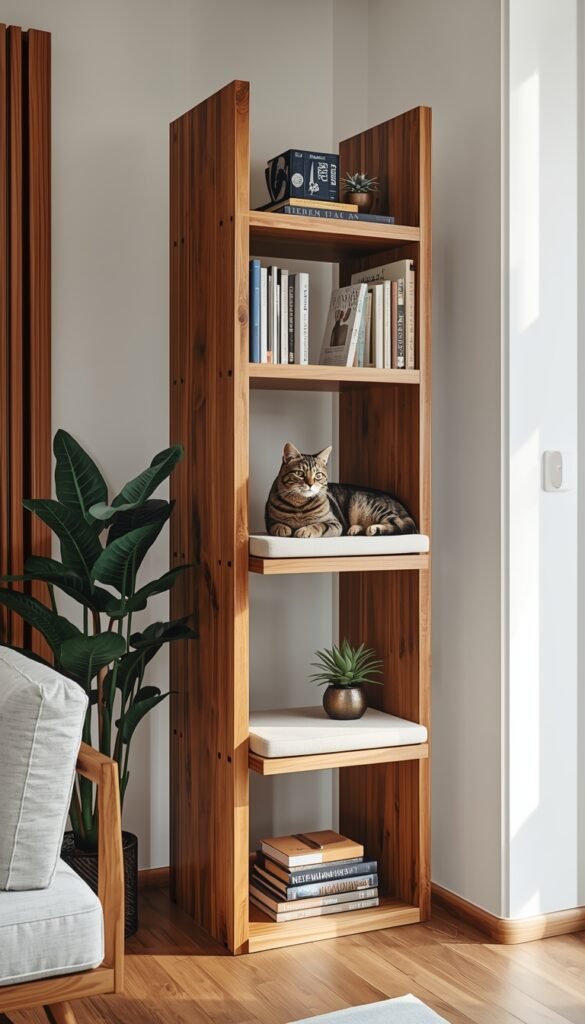
2. Shelving Cat Condo
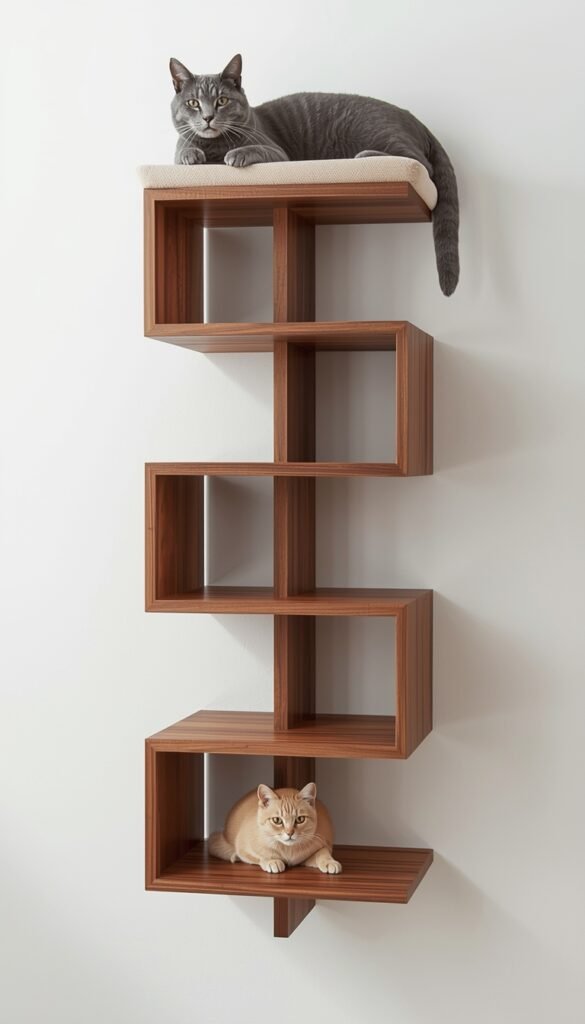
Turn dead wall space into prime cat real estate
Every home has at least one blank wall that isn’t doing anything useful. For a cat owner, that wall is an untapped resource. A multi-tiered cat condo built from floating shelves turns dead vertical space into a climbing structure, a resting area, and — with some attention to materials and color — a genuine design feature.
The advantage over a freestanding tree is almost entirely aesthetic. You choose the shelf depth, the finish, the spacing between levels, and the cushion colors. Coordinate with your existing furniture and a visitor might not realize it’s a cat structure until the cat appears. Add a sisal-wrapped post between two levels and you cover scratching needs in the same footprint.
For renters or anyone reluctant to put large holes in walls, picture ledge shelves with strong adhesive strips are a lower-commitment version that works for lighter cats. Just check the weight rating carefully before trusting it with a 12-pound Maine Coon.
3. Hidden Cat Bed Under Furniture
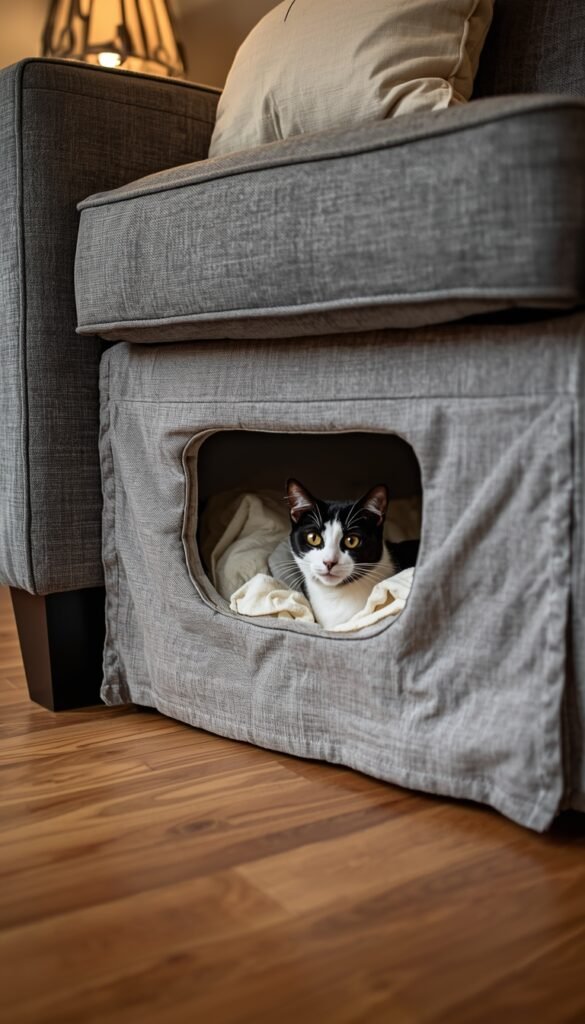
Secret hideouts for secretive animals
This one requires almost no building skills and looks completely deliberate. A hidden cat bed tucked under a sofa, low console table, or coffee table gives cats what they instinctively seek: a protected, cave-like space with one entry point where they can observe the room without being visible from above.
All you need is furniture with at least 8 to 10 inches of floor clearance, a flat cushion that fits the space, and a fabric skirt or valance that ties visually to the piece of furniture above it. Match the fabric to your upholstery and this setup is invisible to most guests until the cat decides to emerge. No construction required. Setup time is around 20 to 30 minutes, including measuring twice.
Pet Mom Tip: Shy or anxious cats almost always prefer partially enclosed spaces over open beds — the sense of having walls on three sides is genuinely calming, not just decorative. If your cat consistently retreats under furniture rather than using an open bed, that’s them telling you exactly what they need. A hidden bed setup works with that instinct rather than against it.
4. Drawer Cat Hideaway
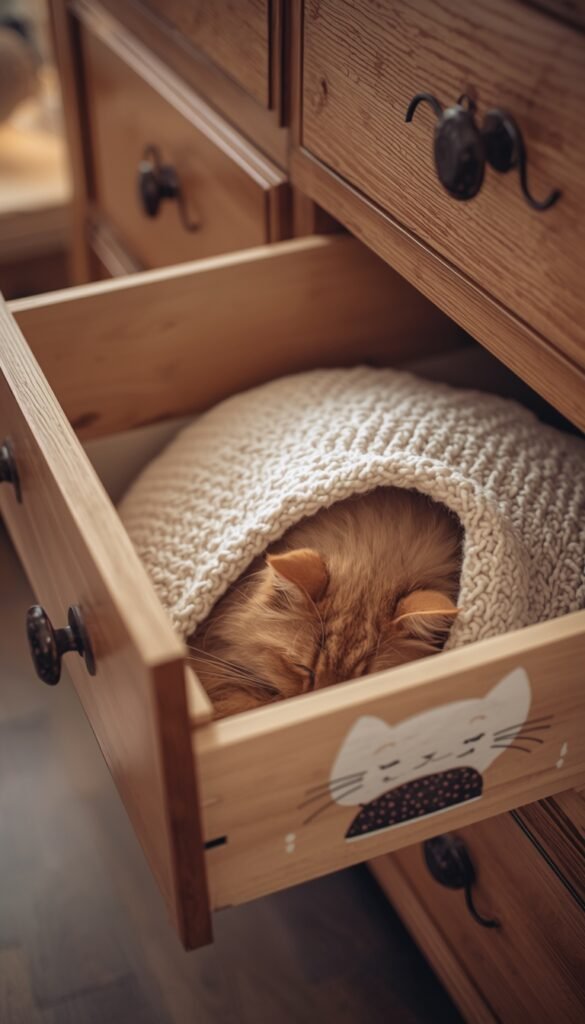
That unused bottom drawer finally has a purpose
Most homes have at least one orphaned drawer — the bottom one in a bedside table or old dresser that accumulated dead batteries, mystery cables, and restaurant menus from 2018. Empty it out. That drawer is now a cat bed.
Line the interior with a soft blanket and a small flat cushion. Slide the drawer back in with the front panel open as the entrance. That’s it. The three enclosed walls and low ceiling create exactly the kind of snug, cave-like space cats choose on their own. If you want to take it further, give the drawer exterior a fresh coat of non-toxic paint to match the room, or add a small cushion to the top as a secondary perch for when your cat wants elevation over enclosure.
Total build time: 20 minutes. Total cost: whatever the cushion costs, which can be nothing if you repurpose a folded blanket. This is the most efficient entry point on the whole list.
5. Stacked Crates Cat House
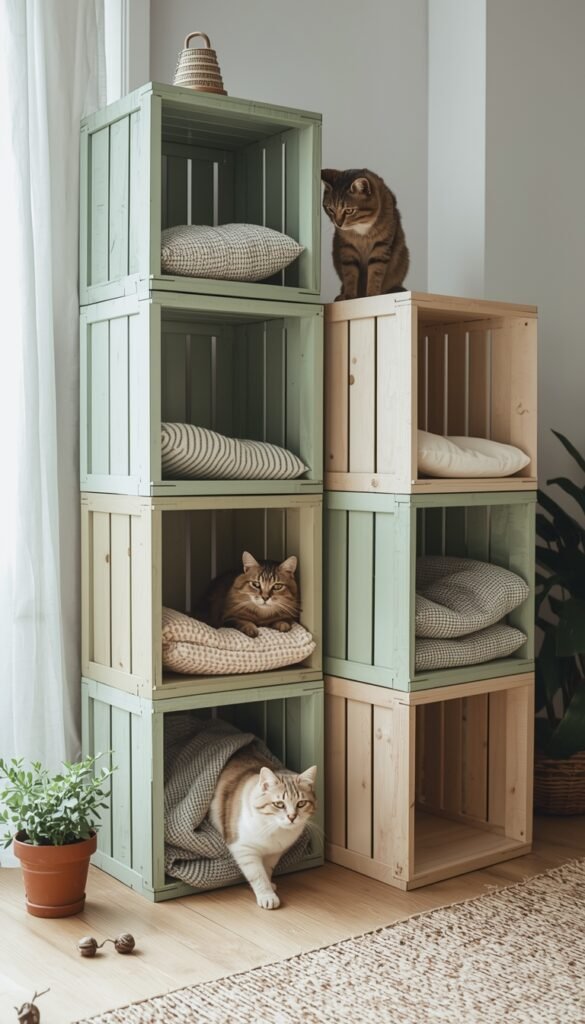
The modular cat mansion
Wooden crates from craft or hardware stores are one of the most flexible raw materials for cat furniture. Stack them vertically for a tower, horizontally for a long low structure, or in an L-shape for a corner unit. Each individual crate is a room; three or four together make something that genuinely functions as a multi-level cat house without requiring any complex cuts or joinery.
Sand every interior and exterior surface smooth before assembly — cats’ paw pads are sensitive to splinters and rough edges. Paint or stain with a non-toxic finish, add a cushion or folded blanket to each compartment, and secure the stacked crates together with L-brackets and screws so the structure can’t shift or tip. This one scales well for multi-cat households since each cat gets their own compartment without sharing.
- 3–5 wooden crates, depending on available space and number of cats
- 120-grit sandpaper for smooth, snag-free surfaces throughout
- Non-toxic paint or stain — water-based options are safest and dry faster
- Cushions or folded blankets — one per compartment
- L-brackets and screws to lock the stack together securely
6. Wall-Mounted Cat Perch
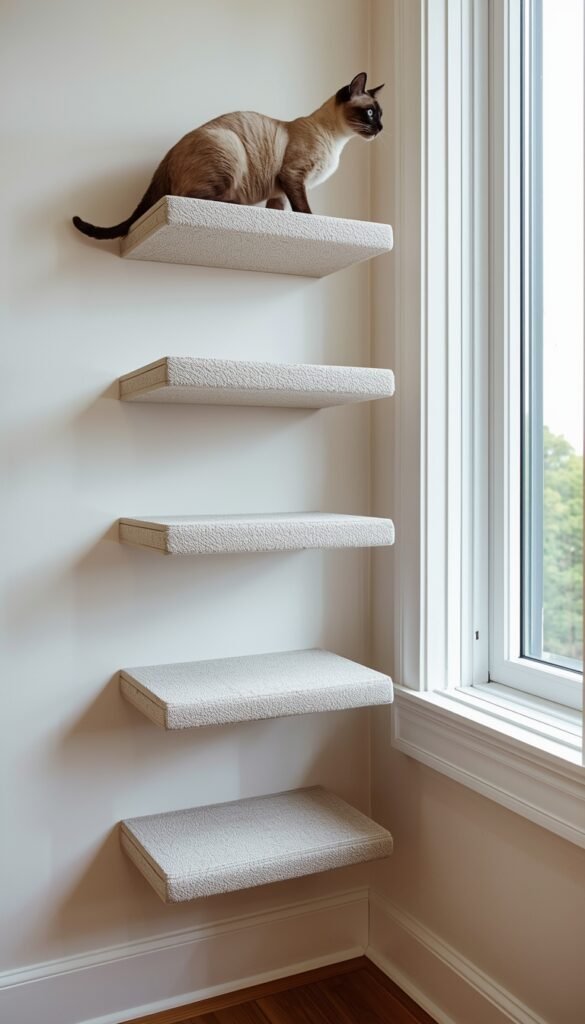
The floating throne your cat thinks they deserve
If there’s a simpler build on this list that delivers as much satisfaction per square foot, it hasn’t been invented yet. A wall-mounted cat perch is a single platform — roughly 12 by 18 inches of plywood, wrapped in carpet or upholstery fabric, screwed into wall studs — and it becomes the most used surface in the house within 48 hours.
Position the first perch at around 4 feet from the floor. Add a second 18 inches higher and slightly offset, and a third higher again, and you have a climbing wall that costs under $30 in materials and takes about an hour to install. Cats who prefer to spend their time watching everything from a distance — which is most cats — will use these constantly.
The mounting is the most important step. Locate wall studs with a stud finder before drilling, use appropriate screws for your wall type, and check the weight capacity of your brackets. A well-built perch holds 30 to 40 pounds without any movement. It needs to. Cats don’t test things gently.
7. Cat House in a Bookcase
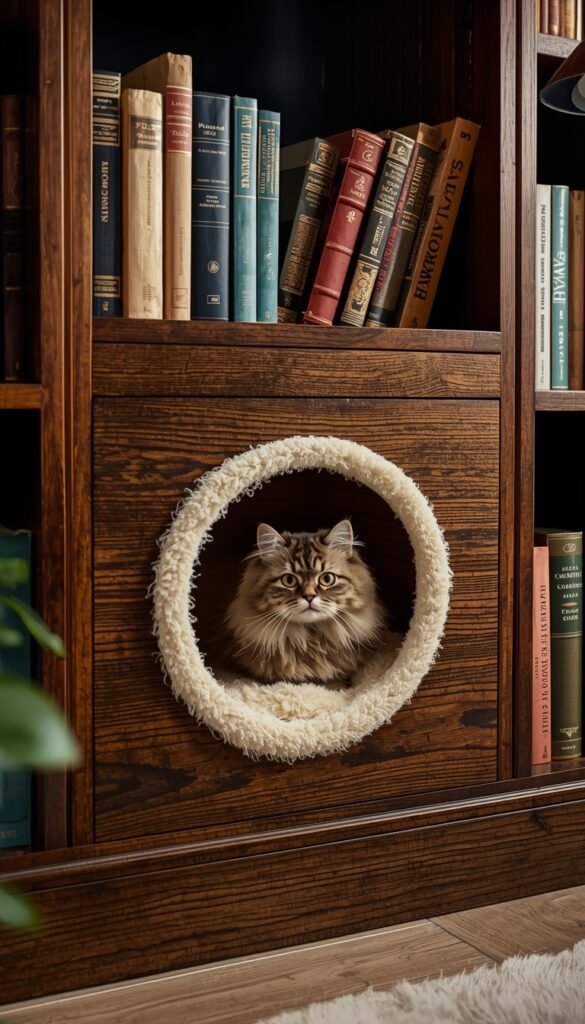
Literary cat quarters
If you have a bookcase with a shelf that’s been acting as a display surface for things that don’t need displaying, reassign it. Converting one bookcase shelf into a dedicated cat space takes less than an hour and costs almost nothing beyond a cushion and possibly a strip of fabric.
Choose a shelf that has walls on both sides and a ceiling above — that enclosed feeling is what makes it work. Add a cushion to the floor of the shelf, hang a short fabric panel across the front opening as a partial curtain, and the shelf transforms into a cave-like nook that most cats will claim immediately. For extra refinement, cut a circular opening in a piece of cardboard and tape it inside the entrance to create a porthole effect — a small touch that makes it read as intentional rather than improvised. For more ideas on keeping indoor cats mentally engaged, MomPaw’s guide to cat enrichment at home covers the full picture beyond furniture.
This plan works particularly well in rented homes where wall mounting isn’t an option. No drilling, no structural changes, and the whole setup is reversible if you move.
8. Multi-Use Cat Furniture
When you want function without the clutter
This category is for households where a visible cat tree simply doesn’t fit the aesthetic. Multi-use cat furniture looks like normal home furnishings until your cat pops out of a coffee table or a sisal panel reveals itself along the base of the sofa. These builds require a bit more planning than the others, but the result is a home that accommodates a cat without announcing it at every turn.
Three builds that work well:
Cat tree plus bookshelf combo — build vertical shelving that incorporates cat platforms at varying heights. Books on some levels, sleeping space on others. From across the room, it reads as a bookshelf.
Storage ottoman with a cat door — cut a small opening on one side of an ottoman, line the interior with soft padding, and the exterior functions entirely as normal. Guests sit on it. The cat lives inside it. Everyone is happy.
Sofa with built-in sisal panels — attach sisal rope or sisal fabric panels along the base of your sofa frame. This redirects scratching away from the upholstery itself and protects furniture that would otherwise need replacing. Low effort, high impact.
Before You Build: A Quick Safety Check
A few material rules that apply to every plan on this list:
- Avoid plywood with formaldehyde-based adhesives — look for plywood labeled low-VOC or formaldehyde-free
- Use water-based, non-toxic paint or stain only — solvent-based finishes off-gas fumes that are harmful to cats in enclosed spaces
- Anchor anything wall-mounted to studs, not just drywall — cats jump at speed and weight-test everything immediately
- Sand all surfaces thoroughly — a splinter on a paw pad can cause an infection quickly in cats
- Check fabric choices — avoid anything with long loops or loose threads that a claw can catch in; tight-weave upholstery fabric and carpet work best
5 Tips for Building Cat Furniture That Actually Gets Used
Watch where your cat already hangs out. If they consistently perch on top of the refrigerator, build height into your plan. If they live under the bed, enclosed and low is the direction to go. Building for the cat you have — not a theoretical one — is the fastest way to get immediate use out of whatever you build.
Start with one plan and observe. It’s tempting to plan a full cat wall on the first weekend. Instead, build one shelf or one drawer conversion, watch how your cat uses it over a week, and let that information guide the next build. You’ll learn more from one week of observation than from any planning session.
Introduce a new structure with a treat or familiar scent. Place a treat inside or on top of the new build, or rub a soft cloth on your cat’s face and wipe it onto the structure to transfer their scent. This dramatically reduces the one-week standoff period where they pretend it doesn’t exist.
Plan for cleaning from the start. Removable cushion covers, accessible shelf surfaces, and non-porous finishes make the difference between a cat house that stays fresh and one that becomes a hygiene problem within a month. If it can’t be cleaned easily, don’t build it that way.
Match the build to the room, not just the cat. A structure that clashes with your existing furniture will bother you every day. Pick finishes and colors that coordinate with the room. You’re far more likely to maintain something you actually like looking at, and your home stays yours even as the cat expands their territory.
Pick One Plan and Start This Weekend
Building a DIY cat house isn’t about grand renovation projects or impressing anyone — it’s about designing a space that works for both of you. The plans here range from a 20-minute drawer conversion that costs next to nothing, to a full weekend vertical build that doubles as a design feature. There is genuinely something on this list for every skill level, every budget, and every living situation.
Start with the plan that fits where you are right now. Build it, watch what your cat does with it, and adjust from there. Some cats claim a new structure within the hour. Others will ignore it for a week and then act like it was their idea all along. Both outcomes are entirely normal.
Your cat already owns the house. You might as well make it look intentional.